Folio: designable sheets
Flowra's forms and documents studio: an A4 sheet that you or the assistant design, where you decide which part each side fills, send it with a guest link or teammate access, collect two-way signatures and archive the output in My Files.
Open in Flowra/folioCollaboration agreement sheet
My fieldAmount and scheduleCounterparty fieldName and addressSignatureCapturedGuest linkOnExportIn this sheet's folderThe guest link opens only the counterparty's fields.
What this is wired to
What Folio is for
Folio is where the formal forms and documents of your work get made: contracts, invoices, receipts, job application or sign-up forms, meeting minutes. Every sheet is a real A4 page whose elements you lay out on the paper yourself, and what you see on screen is exactly what gets printed and archived.
Every sheet has one creator. The creator designs it, decides who fills each field, lets others fill it in, and is the only one who can export it. The other side, whether a teammate or a guest without an account, fills in and signs only the fields that are theirs.
The sheet shelf
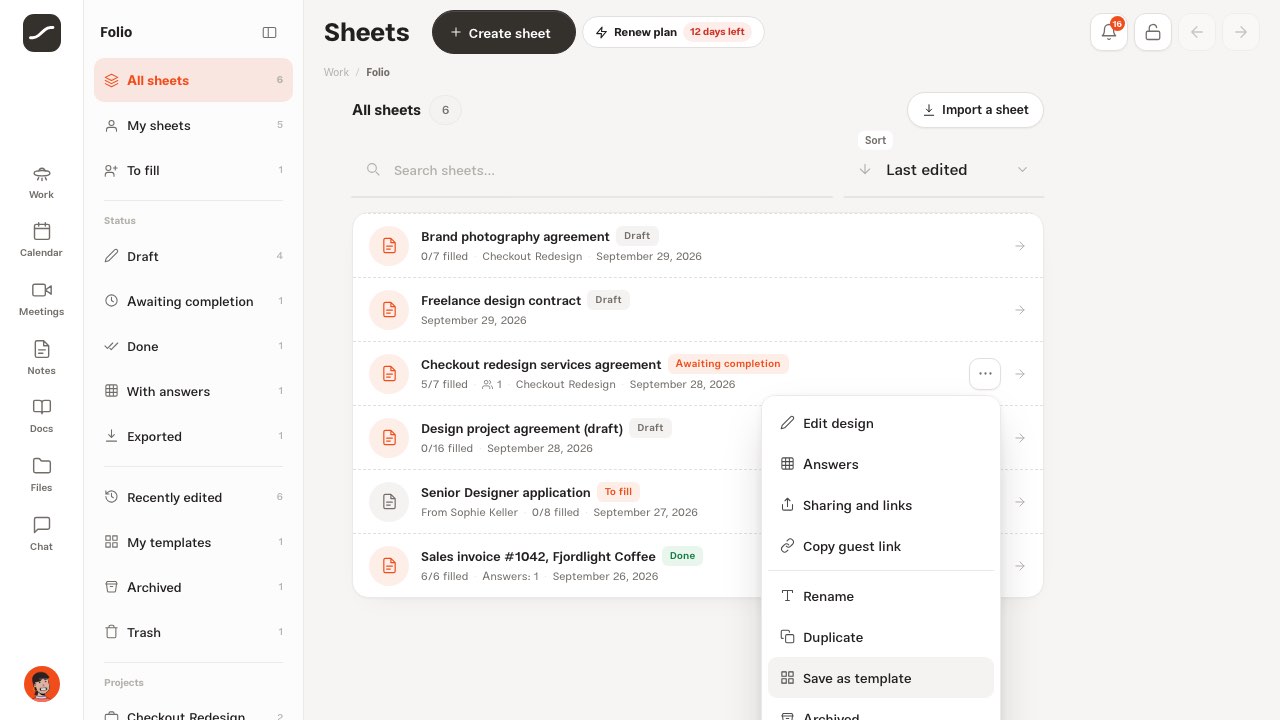
The “Folio” page shows all sheets row by row. Each row has the sheet's name and its status badge, and below it how many fields out of how many are filled, how many answers are archived, how many people have access, which project it's linked to and when it was last edited. A sheet someone else handed you to fill comes with “From” and their name, and its badge reads “To fill” until it's complete.
Above the list there's search (in the sheet name and the creator's name) and sorting: last edited, newest created or name. The three-dot menu of each of your own sheets has edit design, answers, sharing and links, copy guest link, rename, duplicate, save as template, archive and move to trash. For other people's sheets there's only open and “Copy to my sheets”; the copy takes only the design, not the answers, access or history.
The second column and views
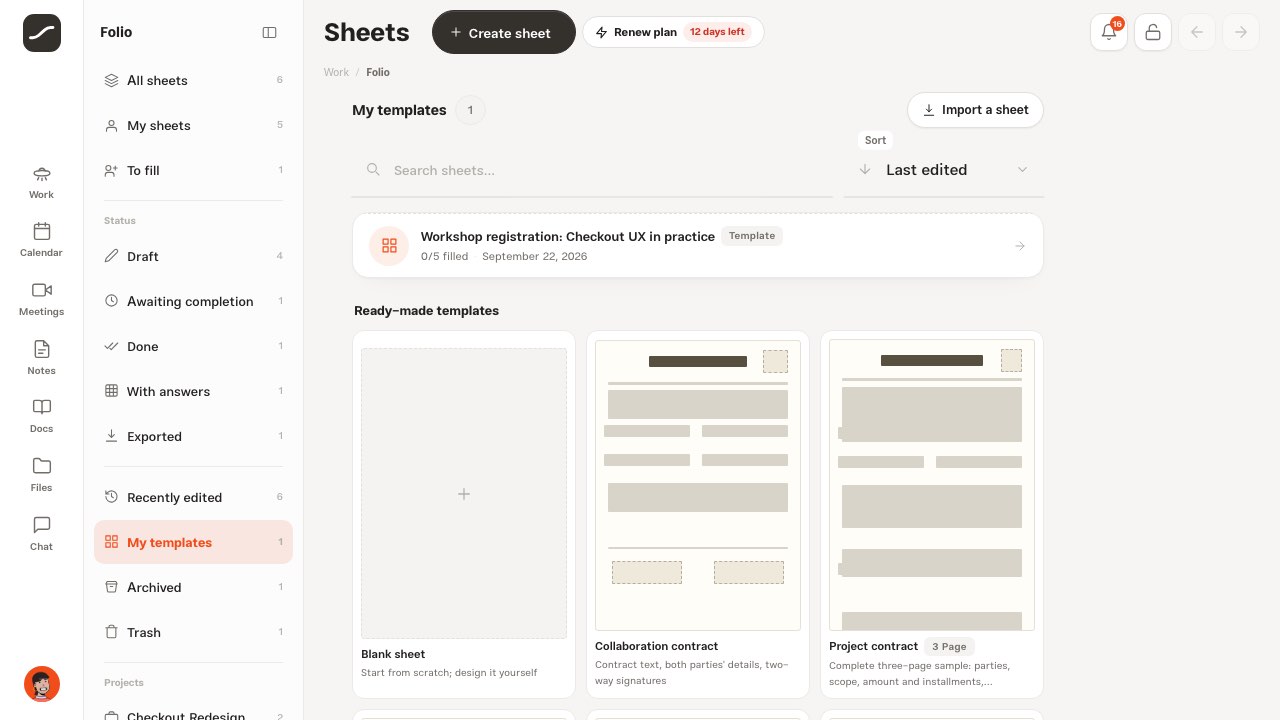
On desktop, the second column beside the page is Folio's own menu and shows the same list from several angles, each with its own count. These are filters on one list, not separate pages, and the page address keeps the view so a reload or a link brings you back to the same place.
Projects show up at the bottom of the column only when a sheet is linked to them; pick a project and the views above filter within it. “Create sheet” is at the bottom of this column too.
- Who: all sheets, my sheets, to fill
- Status: draft, awaiting completion, done, with answers, exported
- Shelf: recently edited (last seven days), my templates, archived, trash
- Projects: each project's sheets
A sheet's status
Status isn't stored; it's read from the sheet itself every time. “Draft” means nothing has been filled in the current round yet and no round has been closed. “Awaiting completion” means some answers or signatures are in and some are still missing. “Done” means all fillable fields are filled, or earlier rounds have been closed and archived and the sheet is empty for the next round.
“With answers” and “Exported” are views, not statuses: sheets that have had a round closed or have been exported. The filled count always comes from the sheet's current fields, so a field deleted after it was filled no longer counts.
Creating a sheet: blank, from a template or imported
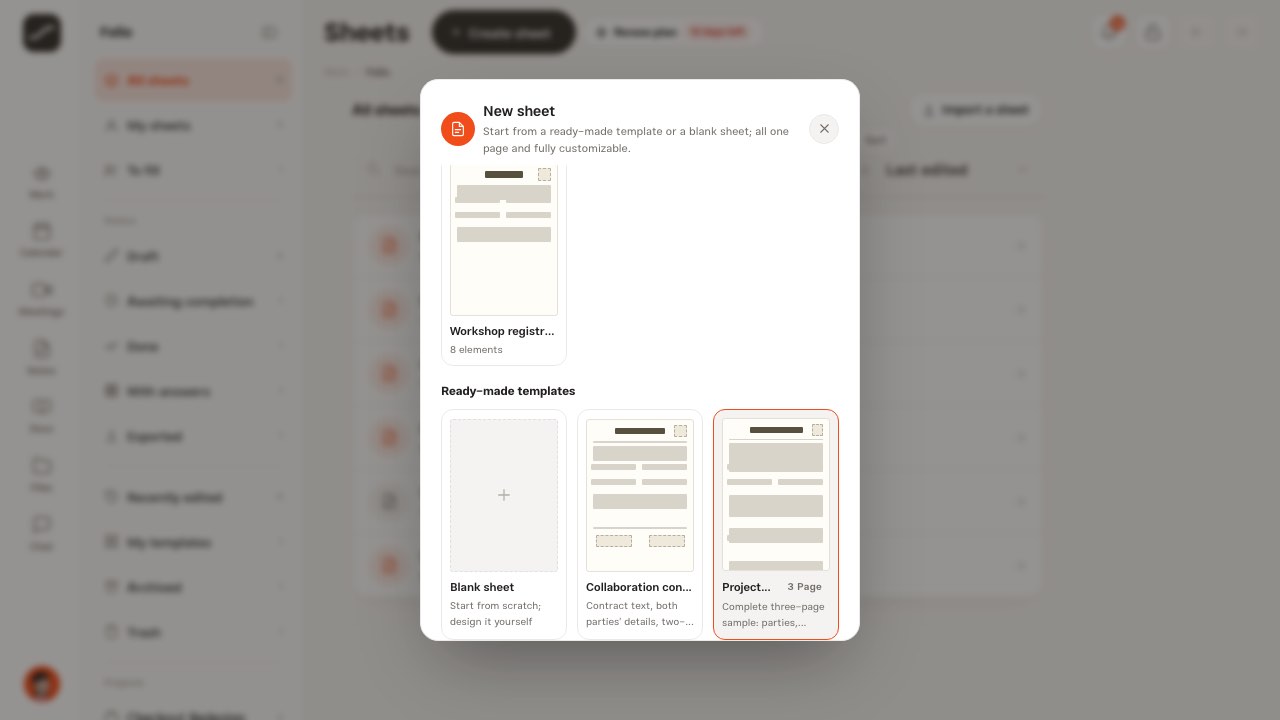
“Create sheet” (in the top bar on desktop, at the top of the page on your phone) opens the new sheet gallery. The sheet name is optional; if you leave it out, the sheet gets the template's name or a temporary name you can change later. A blank sheet opens straight in design mode.
The ready-made templates are: cooperation agreement, project contract (three pages with the parties, subject, amount and installments, obligations, signature and stamp), sales invoice, job application form, sign-up form and payment receipt. Template text is inserted in the app's language, so in English the sheet is created in English too. If the list is filtered to a project, the new sheet is linked to that same project.
“Import a sheet” takes a Folio definition file (the output of “Export definition”, with the .folio.json extension) and builds a new sheet from it; it's an easy way to hand a design to someone else.
Your own templates
Add any sheet to your own templates with “Save as template” from its menu. Your templates appear in the “My templates” view and at the top of the new sheet gallery; picking one makes a copy of its design and takes you straight to editing. “Remove from templates” turns it back into an ordinary sheet.
Folio assistant: a sheet from a description
In design mode, the “Assistant” button next to “Finish & save” opens the Folio assistant. Say what kind of sheet you need, and if you have a base text (an earlier contract, say), attach it from the Library or your device, or paste it; the assistant tells you which attachments it could read. There are ready-made suggestions too: two-way cooperation agreement, leave request form, meeting minutes with signatures, and invoice.
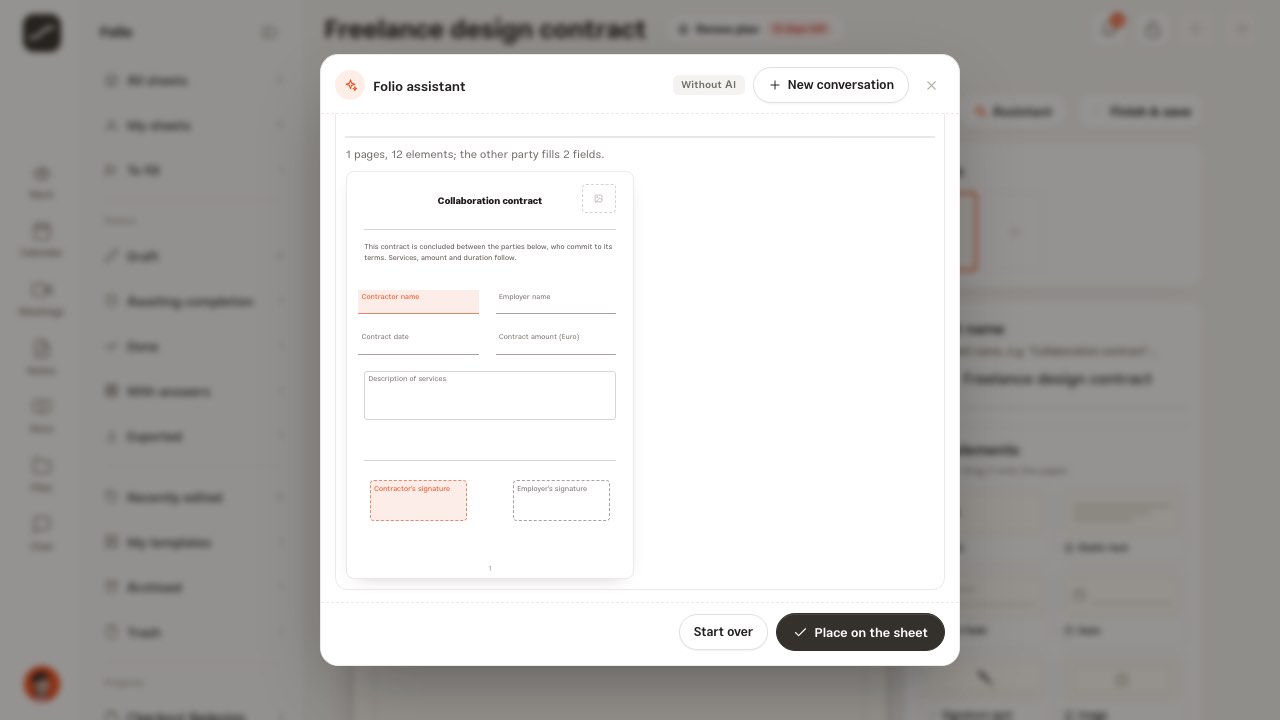
The result is a complete design built from the designer's own elements, with a preview of the A4 pages and the other side's fields in their own color. Rename the sheet right there and hit “Place on the sheet”. If the sheet already has elements, you choose whether the new design is added on new pages or replaces the whole design. Placing it is an ordinary save and is recorded separately in the history, so “Restore” takes you back to the previous version.
Smart replies are part of the Advanced plan. Without it, or when AI isn't set up on the server, the assistant carries on with the same ready-made questions and templates under a “Without AI” label, and lays the attached text out on the sheet as fixed text. The assistant is only available to the sheet's creator.
- Who the other side is: client, contractor, employee, or no other side
- What the other side fills: their details and signature, signature only, or all fillable fields
- Which signatures: both sides, only me, or none
- Which dates: document date, start and end, or no dates
- The amount and its currency, the number of pages (one to three) and the language of the sheet's text
Designing on A4 paper
“Edit” (or a double-click on the paper) takes the sheet into design mode. The “Add elements” side panel has eight element types; click one to place it on the page you're on, or grab it and drop it exactly where you want on the paper. Each sheet holds up to eighty elements.
Drag an element to move it; moves snap to a one-percent grid so rows stay neat. The edge of the selected element changes its width, and box elements have a height handle too. The Delete key removes the selected element. The dotted frame shows the print margin. Fields that are yours to fill show in the brand color, and the other side's in green.
Every change saves automatically a moment later, and the top of the page says “Saved” or “Saving”. “Finish & save” leaves design mode.
- Heading and fixed text: the document's text, with bold and right, center or left alignment
- Text field and date: something one side fills in
- Signature box: a box signed with mouse or finger
- Image: a logo or stamp, which is also saved in My Files
- Table: up to six columns and fifteen rows, with cell text right on the paper
- Divider line
Settings for each element
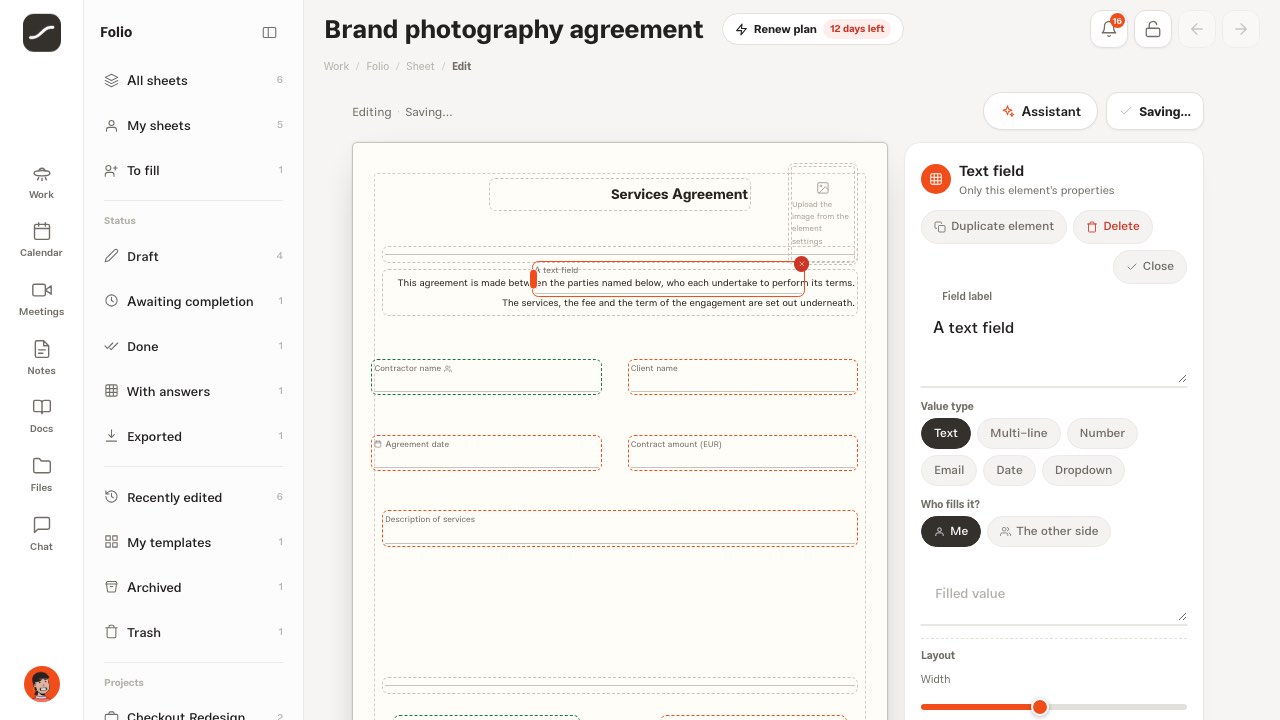
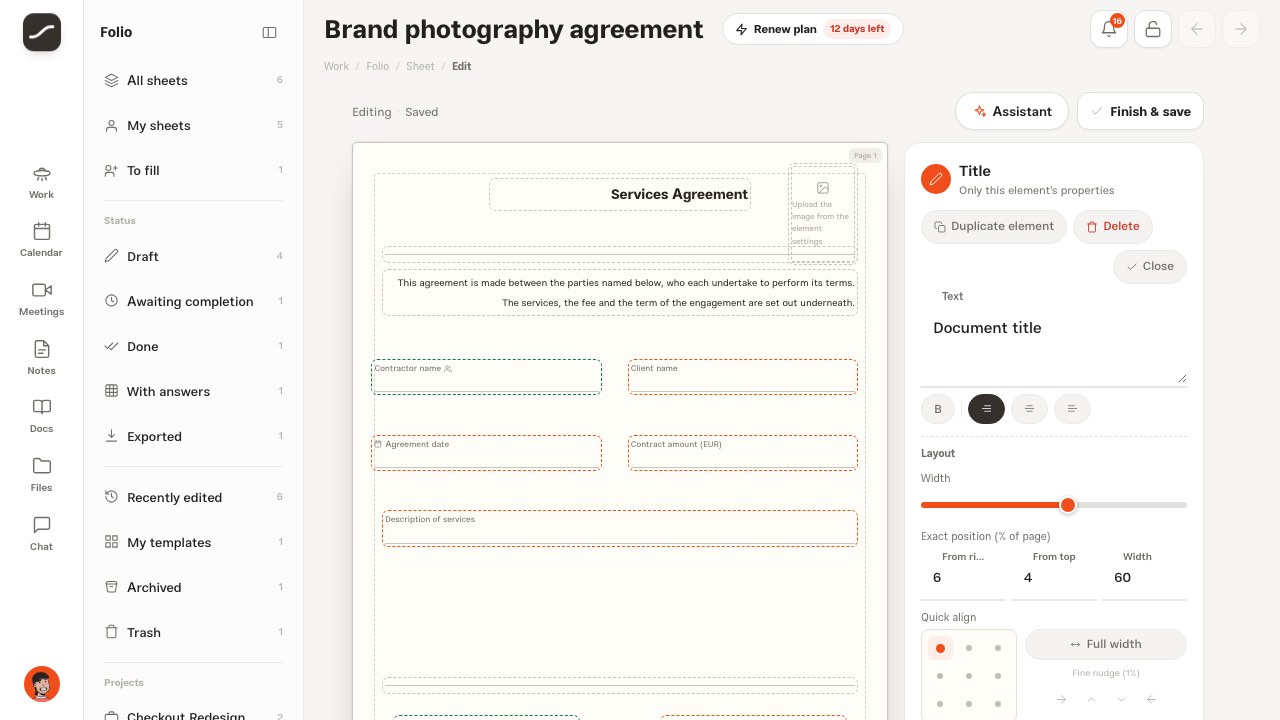
When you select an element, its settings take the panel's place: label or text, “Duplicate element” and “Delete”. In fixed text and headings, select part of the text and hit the bold button.
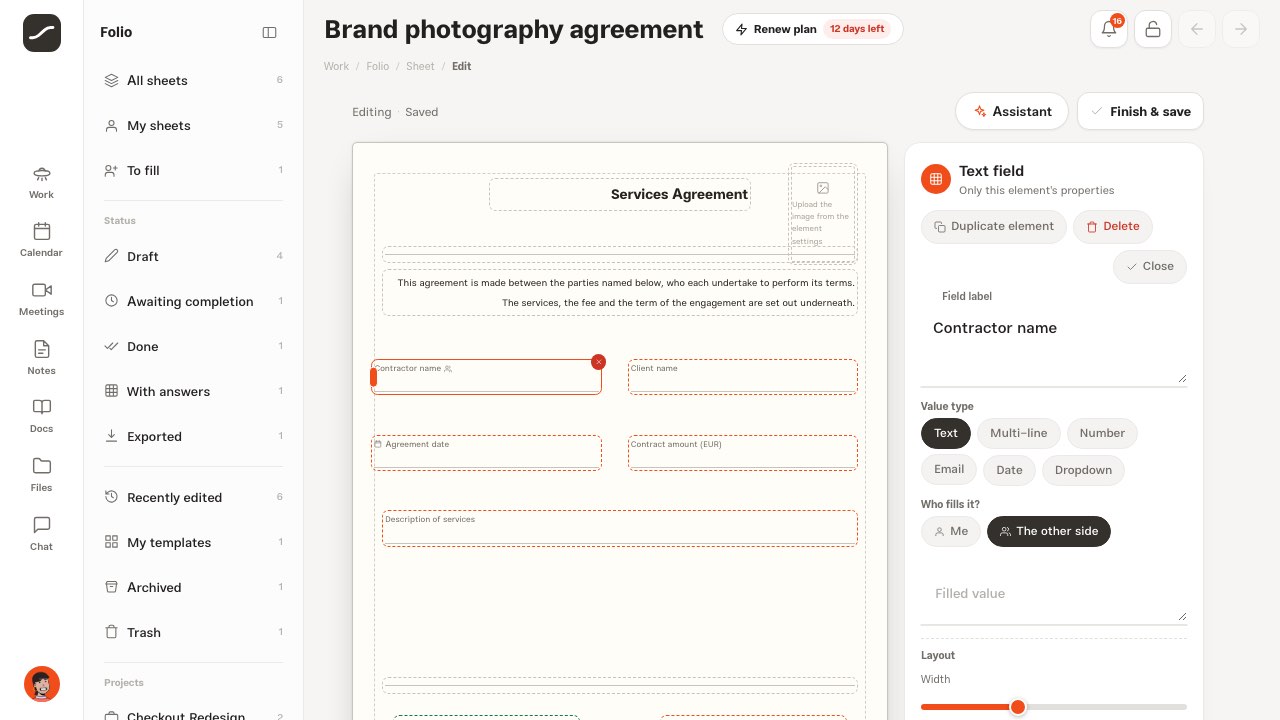
For fields, “Who fills it?” is the most important choice: “Mine to fill” or “Theirs to fill”. The value type is one of these: text, multi-line, number, email, date or dropdown (one option per line, up to twenty options). The creator can also correct a field's filled value right here.
Precise layout lives here too: width with a slider, exact coordinates as a percentage of the page, quick alignment with nine dots on a small sheet of paper, full width, fine one-percent nudges and “Repeat on every page”. Deleting a field that's been filled asks first, since its value is erased too; you can bring it back from the history.
Pages
Each sheet has up to ten pages. The “Pages” card shows a thumbnail of each page: a click takes you to that page, dragging changes the order and every element moves with its page, and “+” adds a new page. An empty page is deleted without asking; a page with elements asks first.
Build an element like a letterhead, logo or fixed signature once with “Repeat on every page”; it sits in the same spot on every page, both on screen and in the output.
Sharing and links
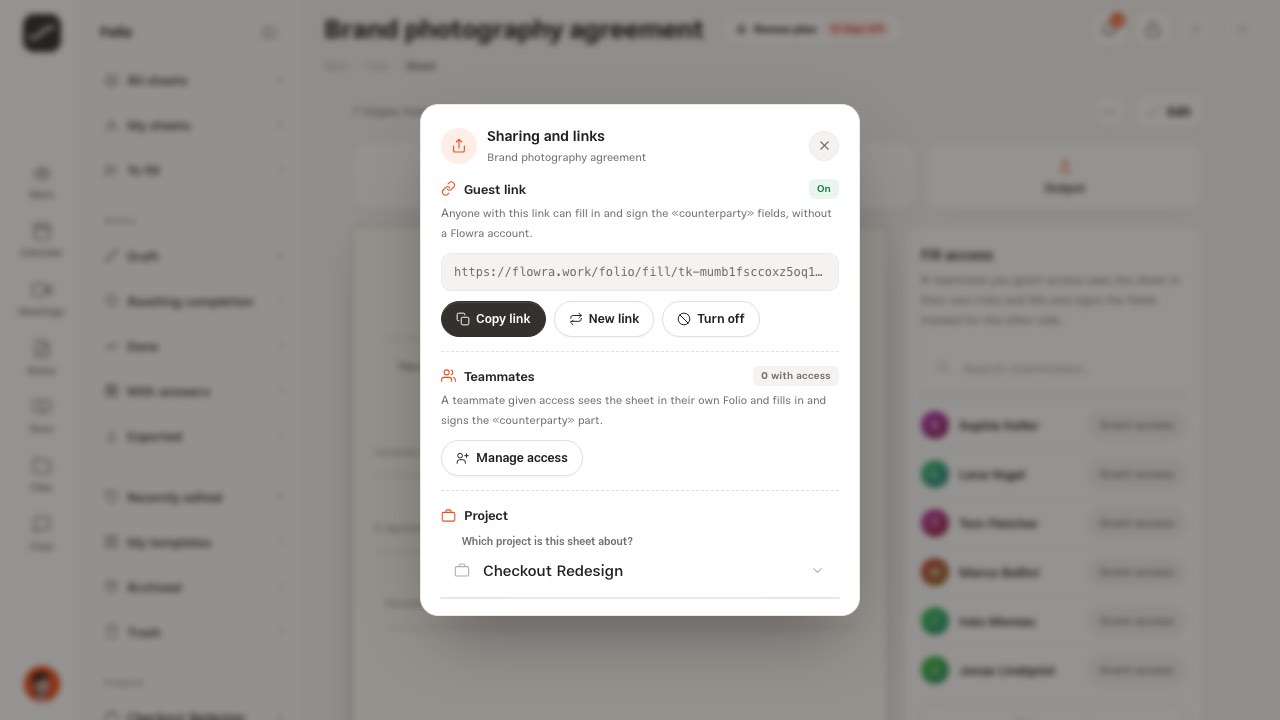
The “Share” tile on the sheet page (or “Sharing and links” in the menu) gathers everything that decides who gets to the sheet in one window: the guest link, the teammates who have access, and the project the sheet is about.
You can turn the guest link on and copy it, turn it off so the old address no longer opens, or make a “New link”, which disables the old one. The link has no expiry date; you close it by turning it off. An archived sheet can't be filled through the link until it's restored from the archive.
- Hit “Share” on the sheet
- Tap “Turn on and copy link” and send the link
- If the link has spread somewhere, create a “New link”
- When the work is done, turn the link off
Fill access for teammates
The “Fill access” card on the sheet page shows the teammates from your workspaces, with search when the team is large and the people who already have access at the top. “Grant access” sends them a notification, and the sheet shows up in the “To fill” view of their own Folio.
A teammate, just like a guest, fills in and signs only the fields that are theirs to fill, and the creator's fields are locked for them. The creator can correct the other side's answer. Hit “Has access” again and access is revoked, and that is recorded in the history too.
Filling in and two-way signatures
Outside design mode, tap any field that's yours to fill to open the fill window; fields with the people badge are the other side's to fill. The value is checked against the field's type: a number must be a number, an email an email, and a dropdown accepts only one of its options. Clearing a field removes its value.
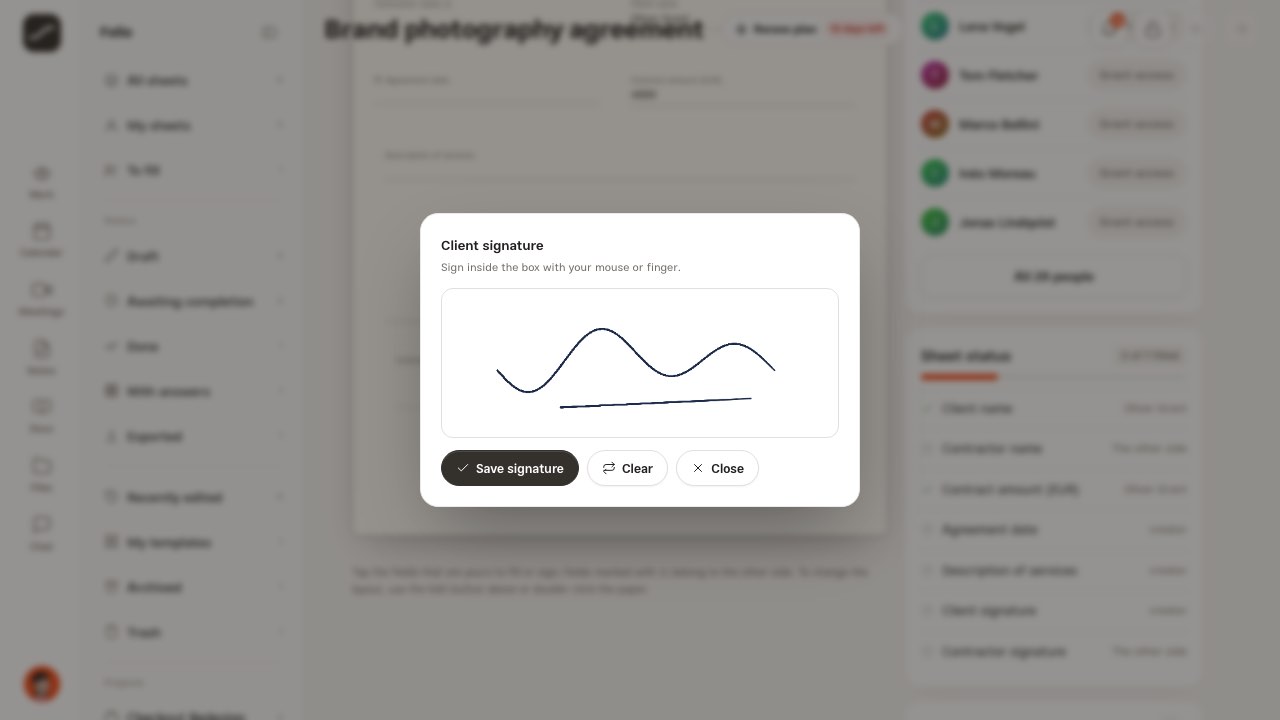
The signature is drawn inside the box with mouse or finger and lands on the sheet with “Save signature”. It's stored as part of that same entry, not as a separate file, with the signer's name and time; so the version you export is exactly what the other side signed, not a reconstruction of it. Two-way means each side puts their own signature on the same single sheet.
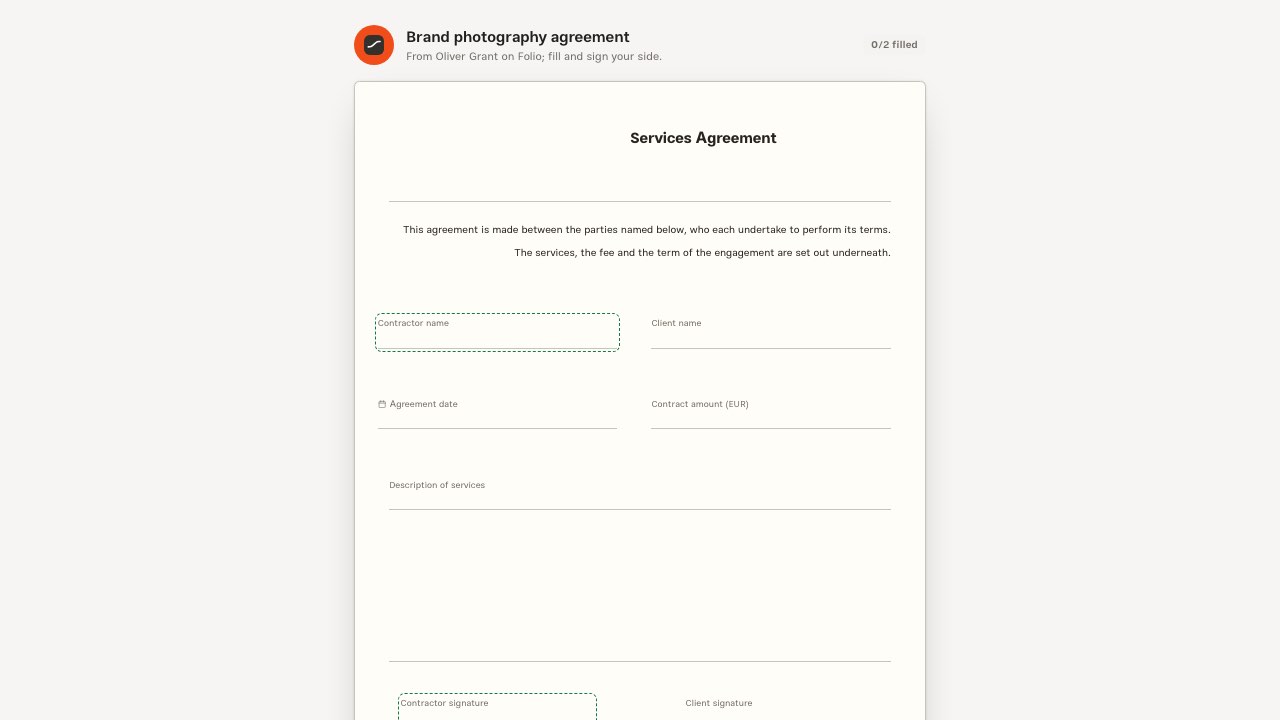
Guest link: the other side without an account
With the link, the guest reaches a simple page that says who the sheet is from. First they type their name, because it's recorded next to everything they fill in or sign; the browser remembers it. Then the fields with a green frame are theirs to fill, and the rest of the sheet is read-only.
That route's response deliberately leaves out the history, the access list and earlier answers: the guest is there to fill in the sheet, not to see the whole file. An archived sheet is read-only for the guest, and a sheet in the trash doesn't open through the link.
- They open the link and type their name
- They hit “Start filling”
- They fill in the green fields and sign their own signature box
- Every entry reaches your sheet instantly, and a notification arrives
Notifications
When the other side fills in or signs your sheet, you get a notification; a signature is mentioned in the notification's title. For each sheet and each person only one unread notification is kept and refreshed, so a guest who fills six fields doesn't create six notifications. You also get a notification when someone shares a sheet with you to fill.
Status and change history
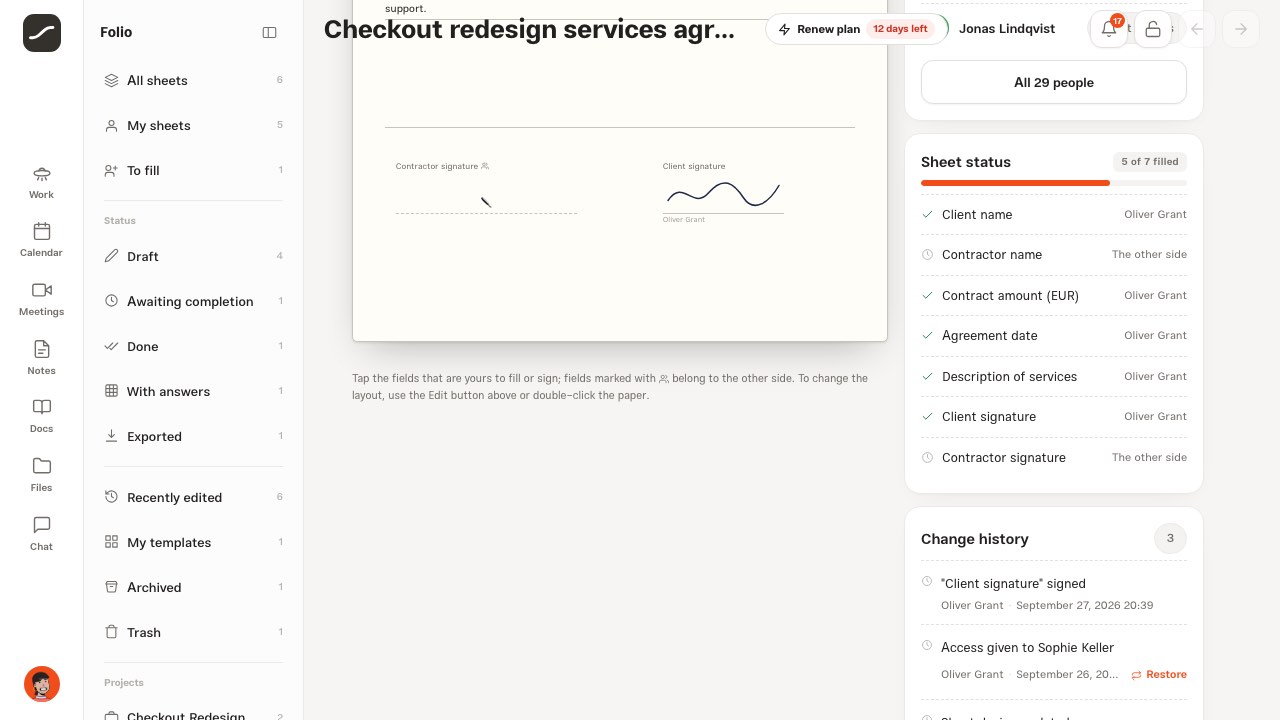
The “Sheet status” card, with a progress bar, tells you how many fields out of how many are filled, and next to each fillable field the name of whoever filled it, or whether it's waiting for the creator or the other side.
“Change history” keeps every meaningful change with a name and time: design saves, fills and signatures, granting and revoking access, designing with the assistant and closing rounds. One person's back-to-back autosaves within five minutes merge into one, so the history shows intent rather than every keystroke, and the last twenty versions are kept. The creator can restore the sheet to any version; it asks first, and the restore itself is recorded in the history too.
Rounds and answers
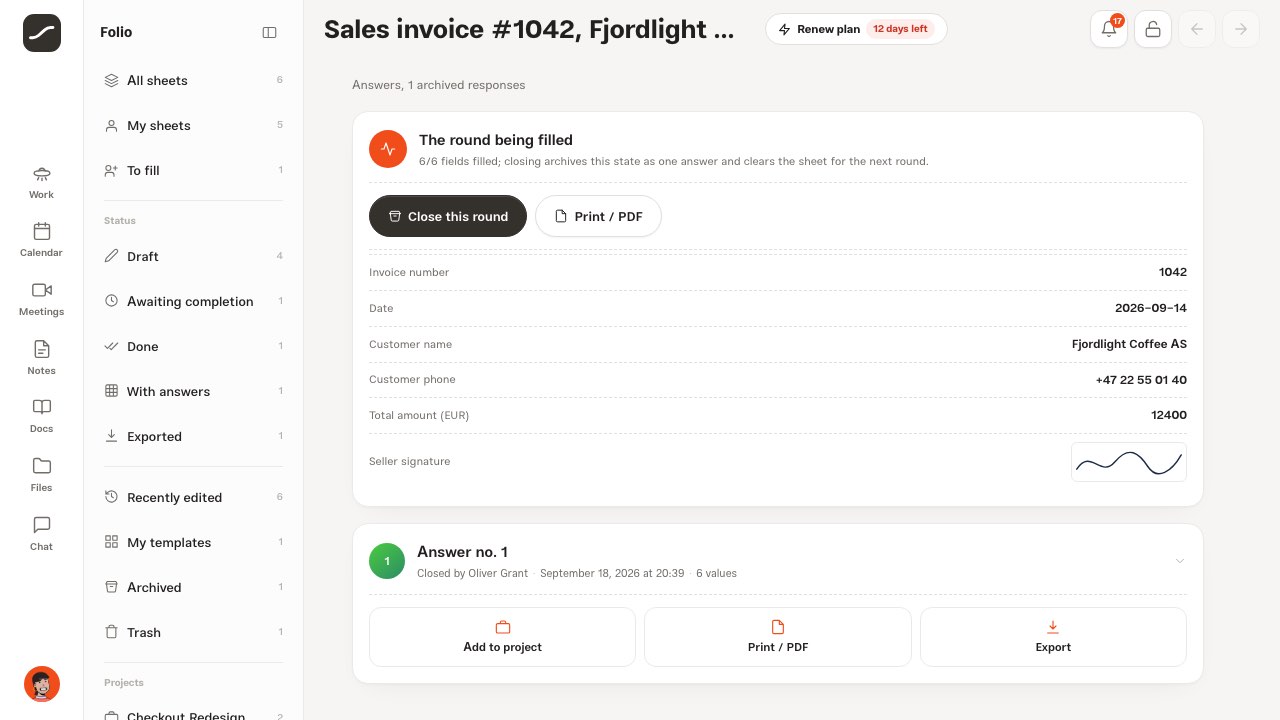
One sheet can be filled again and again, like a sign-up form or a receipt. The “Answers” page shows the round being filled with a list of its values. “Close this round” archives that state, with its design, values and signatures, as a numbered answer and clears the sheet for the next round. An empty round can't be closed.
Every archived answer keeps the name of whoever closed it and when, and you can view it as the same A4 sheet or as a list of values, print it or save a PDF, export it to My Files, or attach it to a project's or company's documents with “Add to project”.
Export and archive in My Files
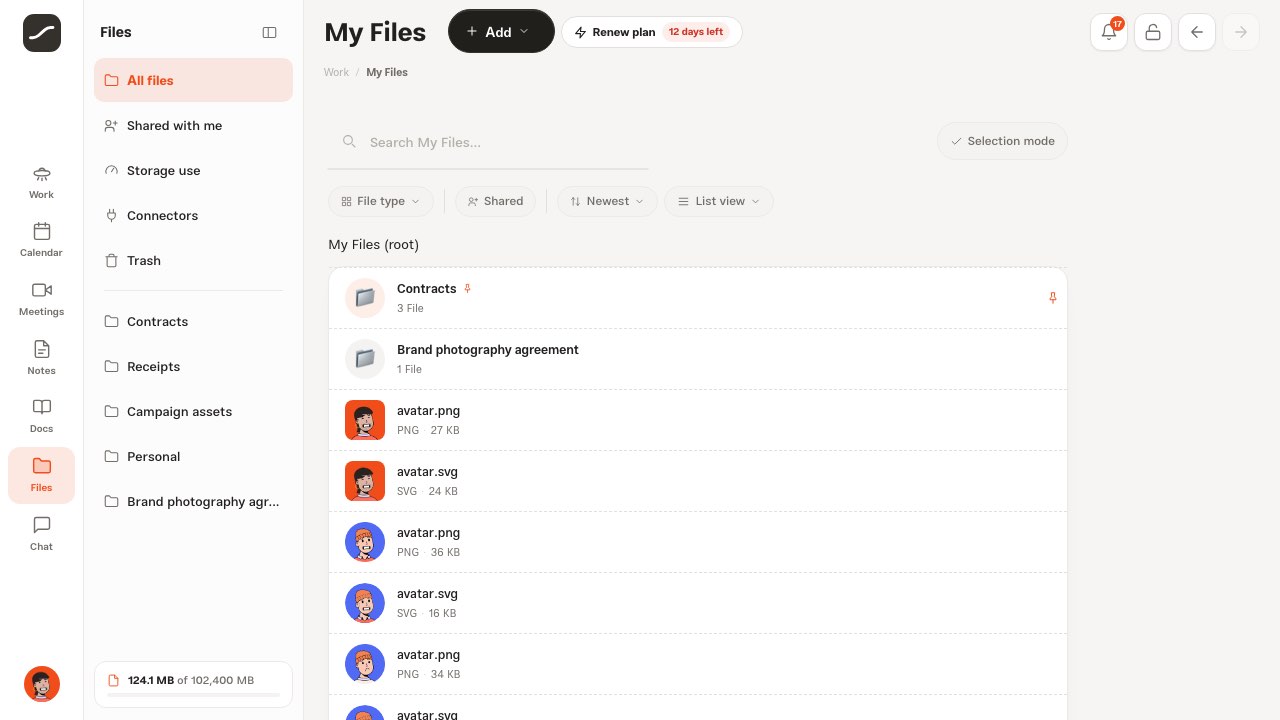
The “Output” tile has three options. “Print / PDF” opens the sheet just as it is in the browser's print window so you can print it or save a PDF. “Export definition” downloads the sheet's design file so someone else can import it. “Export to My Files” saves the print version, dated, in a folder named after the sheet in My Files, and from then on the sheet also shows up in the “Exported” view.
Only the creator can export. My Files are private and open only with permission, which is exactly how a signed document should be.
Archive, trash and deletion
Archiving takes the sheet out of the main list, makes it read-only and closes its guest link; “Restore from archive” brings it all back. The trash closes the sheet to others and to the guest link, and you can restore it until it's deleted forever. Archive and trash don't touch the sheet's content and don't create a version in the history.
“Delete forever” is only available from the trash and also erases filled values, signatures, answers and history; there's no undo.
Folio on your phone
On your phone there's no second column; the same views sit in the “Show” menu above the list, with “Create sheet” and “Import” at the top of the page. The three-dot menu opens from the bottom of the screen. On a sheet, answers, share and output are three equal-size tiles.
In design, the paper is full width and the “Add elements” button opens the elements panel and “New page” from the bottom. Tap an element and its settings slide up from the bottom as a sheet, with “Close” within reach of your thumb. You sign with your finger, and the save button always comes first and runs full width.
A full run: from template to final signature
This is the path most sheets take, and each step is explained in one of the sections above.
- Build the sheet from a template or with the Folio assistant
- Lay out the elements on A4 and decide which part each side fills
- Link the sheet to its project
- Fill in and sign your own part
- Send the guest link or give a teammate fill access
- Follow progress with notifications and the status card
- Close the round and archive the output in My Files